

TMA Software for iPad
mobile-TMA-GO for iPad
Configure List Window
Tap the Options ![]() chevron on the title bar to see options available for the window. Most will include a Configure option, which allows you to choose the details and how they show up on the List window. For example, if you want to see the most recent items at the top of the page, locate the relevant Date section on the Configure window and set the Ascend option as OFF.
chevron on the title bar to see options available for the window. Most will include a Configure option, which allows you to choose the details and how they show up on the List window. For example, if you want to see the most recent items at the top of the page, locate the relevant Date section on the Configure window and set the Ascend option as OFF.
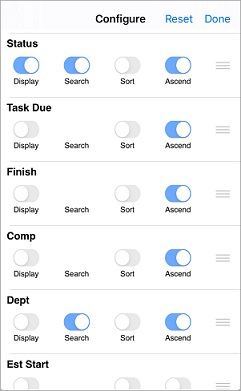
If you make changes to the Configure window, tap the Done button at the upper right to save your selections.
NOTE: The selections on the Configure window reflect fields in the module; therefore, they are different for each List window. See Appendix B: Window Options in mobile TMA GO for iOS for more information about Options on the chevron menu.
Status Symbols in mobile TMA GO
Symbols display on List windows and the title bar of records to indicate the status of a line item:![]() An exclamation mark is an alert that something about the record is incomplete or in error, i.e., it cannot be pushed to the database. Tap the symbol on the title bar of a record to view status messages such as the following:
An exclamation mark is an alert that something about the record is incomplete or in error, i.e., it cannot be pushed to the database. Tap the symbol on the title bar of a record to view status messages such as the following: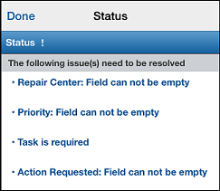
![]() Two arrows in a sync motion shows the line item is ready to be pushed to the database. If you are connected via WiFi or Cellular, the line is uploaded to the main server as soon as you save a record.
Two arrows in a sync motion shows the line item is ready to be pushed to the database. If you are connected via WiFi or Cellular, the line is uploaded to the main server as soon as you save a record. ![]() A cloud indicates that the record has not been downloaded to the device. This lets you know the information is in the cloud and will be downloaded shortly.
A cloud indicates that the record has not been downloaded to the device. This lets you know the information is in the cloud and will be downloaded shortly.  A check mark indicates the line is in sync with the main server. Records downloaded from the server or saved to the server show this symbol.
 ![]() A pencil icon on the title bar indicates that the record is currently being edited and is not saved or in sync with the server.
A pencil icon on the title bar indicates that the record is currently being edited and is not saved or in sync with the server.
How to Use Work Order Advanced Find
To look for Work Orders by selected criteria:
- Tap Advanced Options on the Work Order List window.
- Select or enter the desired criteria.
- Scroll down to choose more options if needed.
- Tap the Done button at the upper right.
When you tap the Done button and return to the List, the only Work Orders that display on the List window are those with the criteria of your choice.
How to View WO Queue List
To populate the window with a List of Work Orders for your Trade or Trades:
- Tap WO Queue on the Work Order menu to open the List window.
- Tap the Options
 chevron.
 - Select Refresh.
- Tap any line of interest to see details about the Work Order.
If desired, you can assign the Work Order to yourself.
How to View Work Order History
To set the criteria:
- Tap the Advanced Options button to see the criteria options. A green icon on the Advanced Options button indicates some advanced options have been set; however, you can change these at any time.
- Select a Completed Date From and Completed Date To. If no date is entered, mobile TMA GO sets a default range of 90 days from the current date.
- Scroll down the window to set other filter options.
- Select a Location or an Item in the lower fields. A selection in one of these fields is required for successful download.
- Tap Done on the window.
This action returns you to the Work History window. Notice that the Advanced Options button now displays an asterisk (*) to indicate that criteria have been set. The search for Last Modifier, i.e., the last person that modified the record, is a “contains” search that searches by “First Last” name rather than “Last First” or “User ID.”
Tap the Search Server button to download any records that match your criteria.
Tap the chevron ![]() at the upper right of the Work History window and select Configure to select the sort order for viewing lines on the Work History window.
at the upper right of the Work History window and select Configure to select the sort order for viewing lines on the Work History window.
How to Post Labor
Follow the menu path to the Labor window, and tap the Add  icon at the upper right of the window. This opens the QP Labor window where you can record hours spent on a particular job. Typically, several required fields are completed when the window opens. To add a record:
- Tap the Add icon
- Select the WO #.
- Select or verify the Task, Trade, Time Type.
- Enter the Hours spent on the job.
- (Optional) Tap in the Acct # field to add a number*.
- (Optional) Tap the Close Schedule check box.
- (Optional) Tap the Close Task check box if all work is completed for this Task.
- Tap Save at the upper right of the window.
Information posted to these windows is transferred to WebTMA when the record is saved providing you have an active connection.
* If provided, this must be a valid account in WebTMA. When no account is added, WebTMA supplies the default from the hierarchical rules when the record is saved to the database.
How to Submit Requests
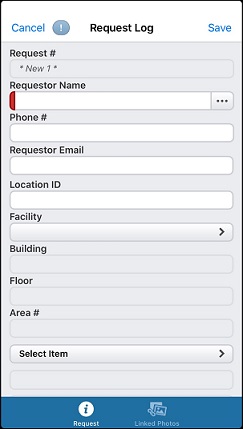
The Requests List window lists any requests that have not been uploaded. If you want to edit the Request, simply tap the line item.
To add a new Request:
- Tap the New button at the upper right of the Requests window.
- Complete the appropriate fields. Note: If you select a Requestor Name using the ellipsis button (i.e., search the server), location and other information are automatically populated with the information from the Requestor’s record.
- Scroll down to complete other fields.
- Describe the work needed in the Action Requested field at the bottom of this window. Note the Action Requested – Read More link is available to expand the field when a large amount of text is entered.
- Tap Save at the upper right.
The new Request displays in the Requests window. It is uploaded when saved if your WiFi or cellular connection is active, but the Request remains in the list of Requests for 24 hours with a status check mark at the right to indicate it has been sent to the database.